Things to Do After Installing Ubuntu GNOME 22.04 LTS #
Check and Install Package Updates #
sudo apt update && sudo apt list --upgradable && sudo apt upgrade && sudo apt autoremove
sudo nala update && sudo nala list --upgradable && sudo nala upgrade && sudo nala
 autoremove
sudo aptitude update && sudo apt list --upgradable && sudo aptitude upgrade && sudo apt autoremove
Enabling SSH #
sudo apt install openssh-server
sudo systemctl enable ssh
sudo systemctl start ssh
sudo systemctl status ssh
sudo ufw allow ssh
My Software and Tools #
sudo apt install \
  nano \
  nala \
  git \
  wget \
  curl \
  mc \
  copyq \
  filezilla \
  neofetch \
  remmina \
  inxi \
  make \
  htop \
  gnome-sushi \
  aptitude \
  zsh \
  powerline \
  fonts-powerline
System Tuning #
sudo apt install gnome-system-tools dconf-editor gnome-tweaks chrome-gnome-shell gnome-shell-extensions
Installing additional support for archivers #
sudo apt install p7zip-rar rar unrar unace arj cabextract
Show the Trash icon on the desktop #
gsettings set org.gnome.shell.extensions.ding show-trash true
Show the Home icon on the desktop #
gsettings set org.gnome.shell.extensions.ding show-home 'true'
Show the External Drives icons on the desktop #
From GUI: Extensions » Desktop Icons NG (DNG) » Settings
gsettings set org.gnome.shell.extensions.ding show-volumes 'true'
Add create ‘New Document’ option to Nautilus FileManager #
XDG_TEMPLATES_DIR=$(xdg-user-dir TEMPLATES) && cd "$XDG_TEMPLATES_DIR"
touch 'New Text File.txt' && touch 'New Markdown File.md'
Nautilus list view, permanently change the displayed columns #
gsettings set org.gnome.nautilus.list-view default-visible-columns "['name', 'size', 'owner', 'permissions', 'date_modified_with_time', 'starred']"
Default visible columns #
['name', 'size', 'date_modified', 'starred']
['name', 'size', 'detailed_type', 'owner', 'permissions', 'date_modified_with_time', 'starred']
Default column order #
['name', 'size', 'type', 'owner', 'group', 'permissions', 'mime_type', 'where', 'date_modified', 'date_modified_with_time', 'date_accessed', 'date_created', 'recency', 'starred']
Nautilus Copy Path/Name #
Install Z-shell (Oh My Zsh) #
sh -c "$(wget -O- https://raw.githubusercontent.com/ohmyzsh/ohmyzsh/master/tools/install.sh)"
Install plugins: #
git clone https://github.com/zsh-users/zsh-autosuggestions ${ZSH_CUSTOM:-~/.oh-my-zsh/custom}/plugins/zsh-autosuggestions
git clone https://github.com/zsh-users/zsh-syntax-highlighting.git ${ZSH_CUSTOM:-~/.oh-my-zsh/custom}/plugins/zsh-syntax-highlighting
Enable Oh-my-zsh plugins #
nano ~/.zshrc
export PATH=$HOME/bin:/usr/local/bin:$PATH
plugins=(
    git
    zsh-autosuggestions
    zsh-syntax-highlighting
    command-not-found
)
Fix very slow paste #
nano ~/.zshrc
DISABLE_MAGIC_FUNCTIONS=true
Terminal themes: #
bash -c "$(wget -qO- https://git.io/vQgMr)"
- Cai (32)
QT Applications Style #
sudo apt install -y qt5-style-plugins
echo "export QT_QPA_PLATFORMTHEME=gtk2" >> ~/.profile
Install Google Chrome #
Install Visual Studio Code #
Install Gnome Extensions #
-
Dash to Panel
-
Arc Menu
Install Arc Menu GNOME dependencies
sudo apt install gnome-shell-extensions gnome-menus gir1.2-gmenu-3.0Fix: Settings Shortcut
ArchMenu Settings->Menu->Application Shortcuts->Settings->...->Modify->Commandgnome-control-center -
Caffeine
-
Sound Input & Output Device Chooser
-
User Themes
Synaptic #
sudo apt install synaptic gdebi
Install Synaptic Quick-Search filter: #
sudo apt-get install apt-xapian-index && sudo update-apt-xapian-index -vf
Custom Hot Keys #
Task Manager
Ctrl+Alt+Delete
gnome-system-monitor
Terminal Hot Keys #
sudo apt-get install wmctrl xdotool
# xdotool search --class "$program" windowactivate %@
# xdotool search --name "$program" windowactivate %@
Minimize Terminal
Ctrl+Alt+H
xdotool search -class gnome-terminal windowminimize %@
Show hidden Terminal
Ctrl+Alt+F
xdotool search -class gnome-terminal windowactivate %@
Fonts #
Fonts Dirs #
- /usr/share/fonts
- /usr/local/share/fonts
Install Microsoft fonts #
sudo apt-get install ttf-mscorefonts-installer
Manually Install Fonts #
sudo mkdir -p /usr/local/share/fonts/my_fonts
sudo cp *.ttf /usr/local/share/fonts/my_fonts
sudo chown root:staff /usr/local/share/fonts/my_fonts -R \
&& sudo chmod 644 /usr/local/share/fonts/my_fonts/* -R \
&& sudo chmod 755 /usr/local/share/fonts/my_fonts \
&& sudo fc-cache -fv
Fix NTFS #
sudo ntfsfix /dev/sda1
How to disable Ctrl+Shift+U? #
Problem
The problem is that with the “Ibus” input method, Ctrl-shift-u is by default configured to the “Unicode Code Point” shortcut.
You can try this: Type ctrl-shift-u, then an (underlined) u appears.
If you then type a unicode code point number in hex (e.g. 21, the ASCII/unicode CP for !) and press enter, it is replaced with the corresponding character.
Solution
This shortcut can be changed or disabled using the ibus-setup utility:
- Run
ibus-setupfrom the terminal (or open IBus Preferences).
ibus-setup
- Go to
Emoji. - Next to
Unicode code point:, click on the three dots (i.e. …). - In the dialog, click
Delete, thenOK. - Close the IBus Preferences window.
Boot repair #
sudo add-apt-repository ppa:yannubuntu/boot-repair
sudo apt-get update
sudo apt-get install -y boot-repair
boot-repair
Install OpenVPN plugin #
sudo apt install network-manager-openvpn-gnome openvpn-systemd-resolved
VPN FritzBox #
sudo apt-get install network-manager-vpnc-gnome
- Starten Sie die Advanced Network Configuration, z.B. im Terminal über
nm-connection-editor.
nm-connection-editor
- Klicken Sie im Abschnitt
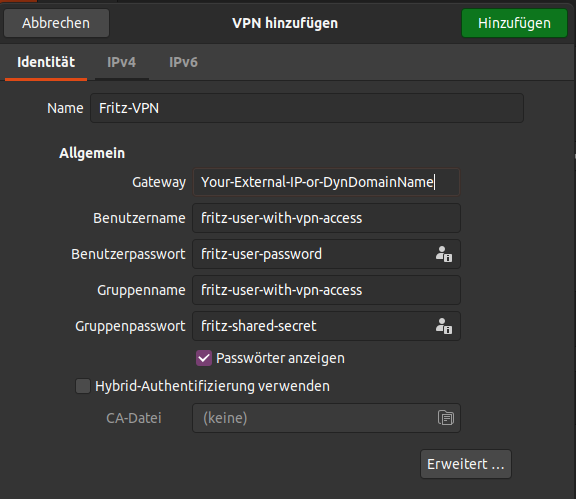
VPNauf dasPluszeichen. Das FensterVPN hinzufügenwird geöffnet. - Wählen Sie im Fenster
VPN hinzufügenden EintragCisco-kompatibler VPN-Client (vpnc)aus. - Tragen Sie im Eingabefeld
Nameeinen beliebigen Namen (FRITZ!Box-VPN) ein. - Tragen Sie im Eingabefeld
Gatewaydie MyFRITZ!-Adresse der FRITZ!Box (pi80ewgfi72d2os42.myfritz.net) ein. - Tragen Sie im Eingabefeld
Benutzernameden Benutzernamen des FRITZ!Box-Benutzers (Max Mustermann) ein. - Klicken Sie auf das Symbol im Eingabefeld
Benutzerpasswort, wählen Sie den OptionPasswort nur für diesen Benutzer speichernaus und tragen Sie dann das Kennwort des FRITZ!Box-Benutzers (geheim1234) ein.
Hinweis: Bei einigen Ubuntu-Versionen muss stattdessen die Option
Passwort für alle Benutzer speichernaktiviert werden.
- Tragen Sie im Eingabefeld
Gruppennameden Benutzernamen des FRITZ!Box-Benutzers (Max Mustermann) ein. - Klicken Sie auf das Symbol im Eingabefeld
Gruppenpasswort, wählen Sie den EintragPasswort nur für diesen Benutzer speichernaus und tragen Sie dann dasShared Secretdes FRITZ!Box-Benutzers (Zj7hPCouK65IrPU4) ein. DasShared Secretwird in den VPN-Einstellungen des Benutzers im AbschnittiPhone, iPad oder iPod Touchangezeigt. - Klicken Sie auf
Erweitert. - Tragen Sie im Eingabefeld
Tunnel-Schnittstellennametun0ein und klicken Sie auf aufApply. - Klicken Sie auf die Schaltfläche
Speichern, um die Einrichtung abzuschließen. Falls die SchaltflächeSpeichernausgegraut ist, klicken Sie noch einmal aufErweitertund dann aufApplyund wiederholen Sie das Speichern. - Klicken Sie bei der VPN-Verbindung auf den An/Aus-Schalter, um die Verbindung herzustellen.
sudo apt install vpnc network-manager-vpnc-gnome
Under Settings choose Network and under VPN add a new connection by clicking on “+”. You have to choose “Cisco-compatible VPN-client (vpnc)“!
Install Multimedia Codecs #
sudo apt install ubuntu-restricted-extras
Enable the Canonical Partners Repository #
The Canonical Partner repository offers some proprietary applications such as Adobe Flash Plugin, that are closed-source but don’t cost any money to use. To enable it, open Software & Updates, once it launches, click on the Other Software tab.
Change background to solid color #
To clear the current image setting:
gsettings set org.gnome.desktop.background picture-uri ""
gsettings set org.gnome.desktop.background picture-uri-dark ""
To set the primary color (the first color in a gradient or the solid color):
gsettings set org.gnome.desktop.background primary-color '#232f3e'
Global Git ignore #
touch ~/.gitignore
nano ~/.gitignore
.idea
git config --global core.excludesFile '~/.gitignore'
Install Flatpak #
sudo apt install flatpak
Add the Flathub repository
flatpak remote-add --if-not-exists flathub https://flathub.org/repo/flathub.flatpakrepo
Blueman - Bluetooth Manager #
sudo apt install blueman
Restart PulseAudio #
systemctl --user restart pulseaudio
Font anti-aliasing in Ubuntu #
Open up .fonts.conf under your home directory (~/.fonts.conf) and paste this in:
<?xml version="1.0" ?>
<!DOCTYPE fontconfig SYSTEM "fonts.dtd">
   <fontconfig>
      <match target="font">
         <edit name="autohint" mode="assign">
            <bool>true</bool>
         </edit>
      </match>
</fontconfig>
Fix: Key is stored in legacy trusted.gpg keyring after Ubuntu 22.04 update #
apt-key list
Note: The DF7587C3 value comes from the last 8 characters of the pub code from the apt-key list output.
apt-key export DF7587C3 | sudo gpg --dearmour -o /usr/share/keyrings/skype-linux-client.gpg
sudo -H gedit /etc/apt/sources.list.d/skype-stable.list
deb [arch=amd64 signed-by=/usr/share/keyrings/skype-linux-client.gpg] https://repo.skype.com/deb stable main
sudo apt update
sudo apt-key del DF7587C3
Fix GRUB for dual boot system #
sudo nano /etc/default/grub
add:
GRUB_DISABLE_OS_PROBER=false
sudo update-grub
Scale GRUB menu on 4K displays #
sudo nano /etc/default/grub
add:
GRUB_GFXMODE=800x600
GRUB_GFXPAYLOAD=keep
GRUB_TERMINAL=gfxterm
sudo update-grub
Add AppImage support #
sudo apt install libfuse2
Adding a folder to side panel nautilus NOT as a bookmark #
nano ~/.config/user-dirs.dirs
Default content
# This file is written by xdg-user-dirs-update
# If you want to change or add directories, just edit the line you're
# interested in. All local changes will be retained on the next run.
# Format is XDG_xxx_DIR="$HOME/yyy", where yyy is a shell-escaped
# homedir-relative path, or XDG_xxx_DIR="/yyy", where /yyy is an
# absolute path. No other format is supported.
#
XDG_DESKTOP_DIR="$HOME/Desktop"
XDG_DOWNLOAD_DIR="$HOME/Downloads"
XDG_TEMPLATES_DIR="$HOME/Templates"
XDG_PUBLICSHARE_DIR="$HOME/Public"
XDG_DOCUMENTS_DIR="$HOME/Documents"
XDG_MUSIC_DIR="$HOME/Music"
XDG_PICTURES_DIR="$HOME/Pictures"
XDG_VIDEOS_DIR="$HOME/Videos"
Restore Defaults #
Any changes takes effect after logout and login.
mv ~/.config/user-dirs.dirs ~/.config/user-dirs.dirs.broken
xdg-user-dirs-update
Fix: GNOME Sushi freezes system when previewing OpenDocument #
sudo apt install unoconv
Detach Child Pop-up windows from Parent #
gsettings set org.gnome.mutter attach-modal-dialogs false
Screensaver #
Install #
sudo apt-get install xscreensaver xscreensaver-gl-extra xscreensaver-data-extra
Remove the GNOME screensaver (if installed) #
sudo apt-get remove gnome-screensaver
To start the screensaver via autostart, add the below command in the startup applications #
xscreensaver -nosplash
Disable Screensaver #
xscreensaver-command -deactivate
To activate again #
xscreensaver-command -activate